Right Driver

Help, I have animals nesting in my car!

At various times of the year, animals might look to invade your car and create a nest. Your vehicle has a plethora of warm, dry, dark places for rats, mice, squirrels, birds and insects to inhabit.

Rats have chewed through the electrical wire sheath under the bonnet of a fairly modern car

The things that will attract them are:

  • leaving food or seeds (e.g. grass seed or bird seed) in your vehicle
  • not using your vehicle very frequently
  • parking next to an attractive food source, e.g. next to bins
  • having a hole to the boot or cabin
  • having soy-based cables or pipes
  • parking in an area with a high rodent density
  • parking in a garage which has ready access to birds

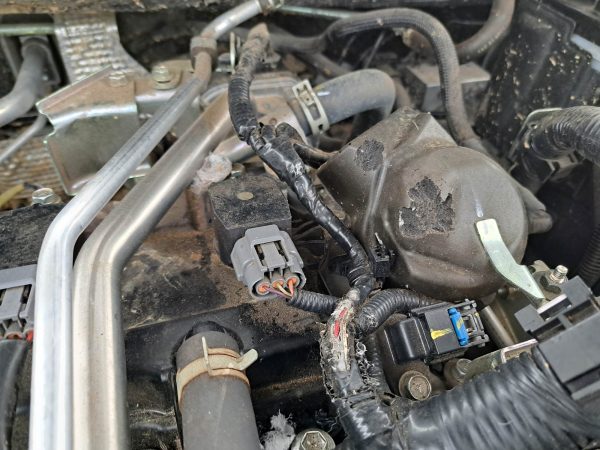
Nesting animals leave droppings and urine. In the case of rats, they will gnaw through cables and pipes to generate bedding for themselves, and to keep their teeth sharp. Newer biodegradable materials can also be a food source for them.

This vehicle has been sitting around in a shed for a while!

If you suspect you have some unwanted tenants in your vehicle, the first step is to check everywhere: the boot, the passenger compartment (under the seats, in the glovebox and up under the steering column), in the engine compartment and, if you can, behind the dashboard.

If you find evidence of animals or insects, first clean out the thing that’s attracting them (e.g. food).

Most animals and birds will leave the vehicle when you enter it, but insects won’t. If it is ants (common) or other insects, then you can use insecticides followed by vacuuming the interior. Use the vacuum on its highest setting, using the crevice tool as this allows you to get into smaller places and provides more suction.

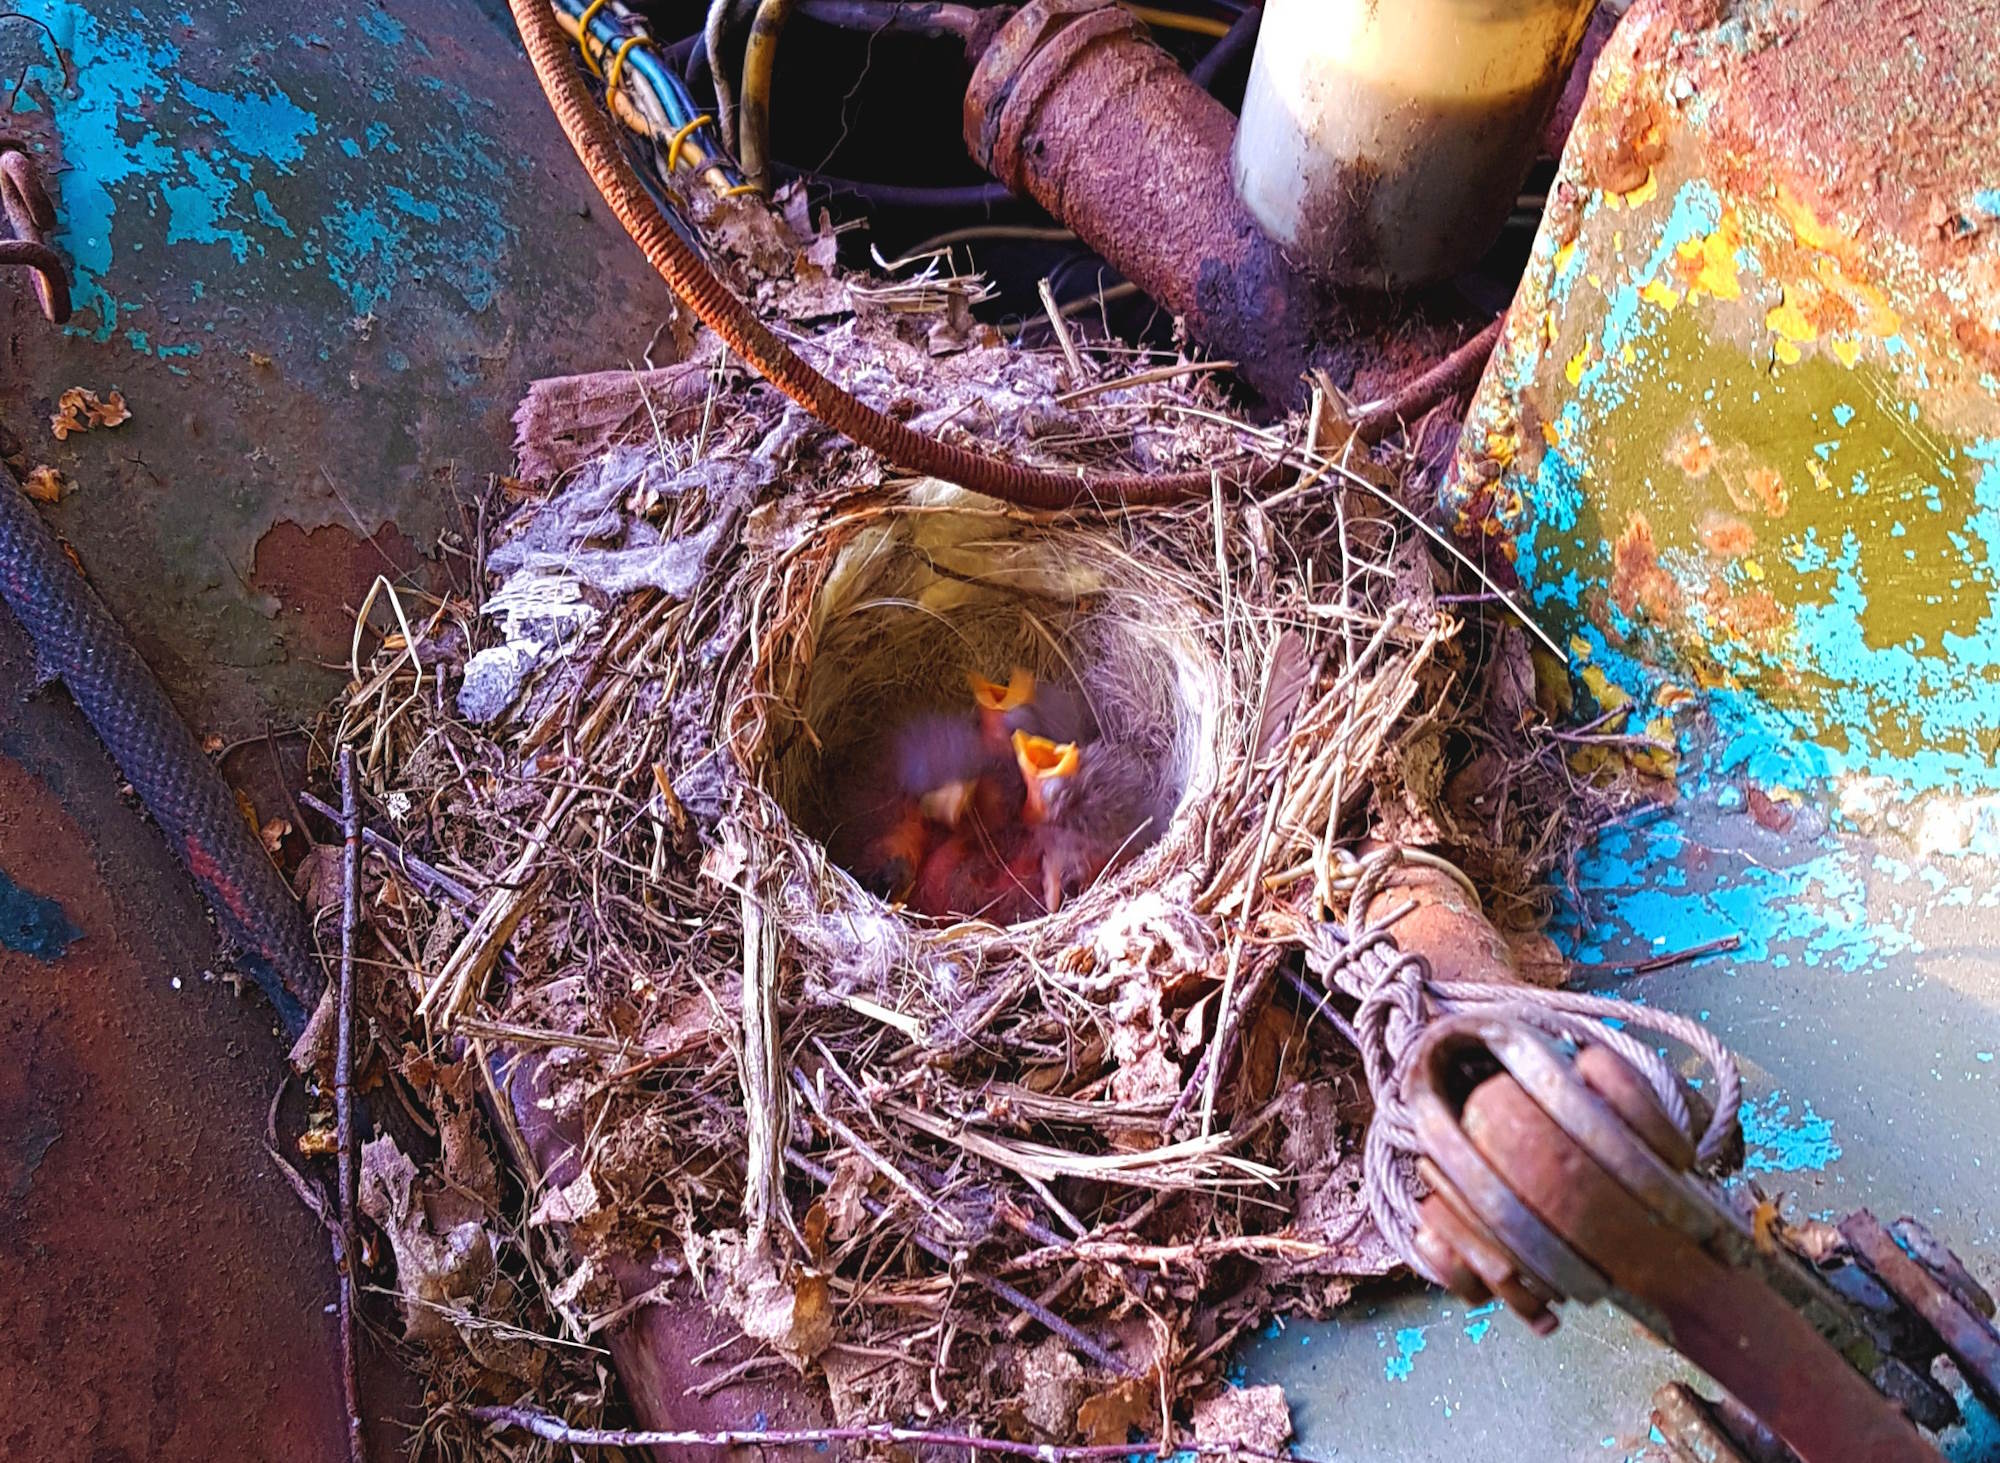
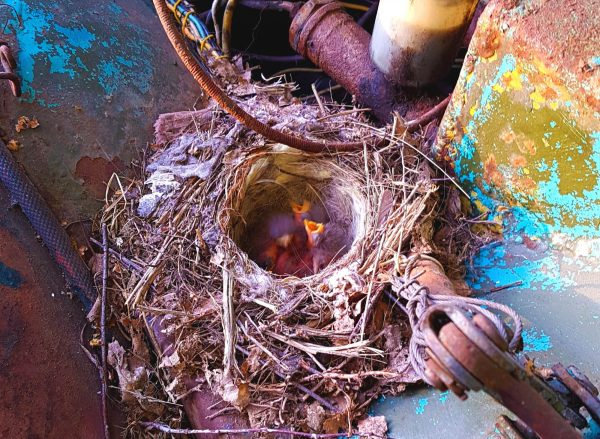
If it is birds, it is most likely a surface nest, usually where the bonnet joins the windscreen, but sometimes in another depression in the bodywork.

Squirrels nesting in the engine bay can be got rid of by either leaving the bonnet open for a few days (they’ll hate the light and additional noise), or you can use a rag soaked in ammonia, or concentrated peppermint spray or peppermint oil.

Rats and mice are more difficult to eradicate. Rats will chew their way through a lot of things, whereas mice can fit through gaps less than 1cm square. Their droppings can be toxic, so before you clean it up, it’s best to damp it down thoroughly with disinfectant, then clean it. Once you are rid of the evidence the animal has been there, check that you block up any holes. You will also need to have any damage to wires repaired.

Similar products used to battle squirrels might work with rats and mice. You can also try an ultrasonic sound generator. Avoid using a water blaster because this can spray the droppings and detritus into more difficult-to-reach places.

Once you have got rid of the animals, you’ll need to get any damage sorted. It can be expensive, so hopefully it’s covered under your car insurance. If you have an EV, you may want to check with a specialist because any wires that are compromised could be carrying a much higher voltage.

Posted in Advice

Driving in hot weather: what you need to know

If you’re driving for work in hot weather, whether it’s a car, truck, forklift or excavator, some health and safety risks need to be addressed.

Sunburn and burns

The sun can heat exposed metal hot enough to cause superficial burns to naked skin, especially if the metal is painted a dark colour. It can also heat up dashboards and steering wheels. Anyone operating an uncovered tractor or excavator will know how hot the seat and controls can become.

If you’re exposed to the sun, then you are at risk of sunburn (which increases the risk of melanoma skin cancer) and premature ageing.

Reducing the risk: UV-protective clothing that gives at least factor 50 UV protection, but is also light and well-ventilated will help. These include long-sleeved shirts, sunglasses, wide-brimmed hats and long trousers. Sunscreen with a high SPF rating should be used – again, at least factor 50. It should be applied 20 minutes before exposure and reapplied every hour or two, depending on the level of sweating.

Heatstroke and heat exhaustion

Exposure to high temperatures over a longer period can cause heatstroke. This can easily happen when on vehicles with no cover, or in vehicles with no air conditioning if they are moving slowly enough to prevent enough air to flow. Symptoms include nausea, headache, elevated heart rate, confusion and, ultimately, loss of consciousness.

Reducing the risk: Take a break at the hottest time of the day, deferring work until later, if possible. Give training to drivers and machine operators on the dangers of heatstroke. Teach your team how to recognise the symptoms in others. Provide shade or air-conditioned areas for breaks.

Dehydration

Not drinking enough causes the onset of dehydration. Eventually, the effects of dehydration are the same as being at the legal blood alcohol limit for driving, which is not desirable when operating heavy machinery or driving. Dehydration also increases the risk of urinary tract infections, kidney stones and kidney failure. The older you are, the more you lose your sense of thirst, so you may be becoming dehydrated without knowing about it.

Symptoms include dark-coloured urine, fatigue, dizziness, extreme thirst, and confusion. Severely dehydrated people need immediate medical treatment, whereas mild and moderate dehydration can be cured by drinking more fluids.

Reducing the risk: Set a minimum level of water to consume per day, even if you don’t feel thirsty. A good minimum benchmark could be two litres during the workday on a hot day. Avoid drinks that act as diuretics, such as caffeine-containing drinks like coffee and energy drinks. While they will still hydrate you, they also cause you to lose water.

Equipment breakdown

Hot weather causes more stress on equipment. It reduces the power output of engines, meaning they have to work harder, and they use more fuel. If the air conditioning is active, this places a burden on the engine.

With electric-powered equipment, such as some forklifts, the battery can drain much quicker.

Extreme heat can cause the pressure in tyres to expand enough to make punctures much more of a risk. This is more likely when the last time the tyres were checked or filled was in very cold weather.

Reducing the risk: ensure that vehicles are maintained properly.

Posted in Advice

How does fuel get delivered to a petrol station?

A fuel tanker unloads fuel to a petrol station through a process known as fuel delivery. Here’s a general overview of how it typically works:

Journey preparation

The driver checks the journey management plan and ensures that he/she is fit for duty and for the trip ahead. Delivery documentation is collected.

Arrival at the petrol station

The fuel tanker arrives at the designated petrol station at the scheduled delivery time. The driver should get the big picture of the site and unloading area, and look for a suitable location that provides easy access to the petrol station’s underground storage tanks (also called fill boxes). These are accessed by lifting a cover on the forecourt. The driver must be careful of kerbs, planter boxes, bowsers (pumps), and other objects, being aware of the trailer’s swept path when turning.

Positioning the vehicle

Before unloading begins, the driver must verify the delivery address and make any entries into the on-board computer (if applicable). The driver ensures that the lorry is parked securely (park brakes applied, engine off, key removed) and that all safety measures are in place. This may include setting up safety cones or barriers around the truck, doing a hazard assessment check of any potential issues in the area (e.g. naked flames) and ensuring that all necessary equipment, such as hoses and nozzles, are in good working condition. The driver must not block other users from the pumps, where possible.

Safety measures

The driver must not fill to any fill boxes that have lockout tags on them.

The main safety issue when pumping fuel is static electricity as a spark can ignite the fuel. Static electricity can be generated by product flowing in a pipeline, vehicle movement through air, product being pumped and clothing rubbing against the lorry seat or against itself. The driver must ensure that bonding methods are followed, and that the flow rates are within the guidelines for static electricity creation.

The driver then verifies quantities. They may need to do a dip on each tank and ensure that sufficient ullage is available to receive the quantities required in the customer’s tank. These readings are logged on the delivery document. The ‘safe fill’ levels shouldn’t be exceeded.

Connecting to the underground storage tanks

The driver connects the hoses from the fuel tanker to the underground storage tanks at the petrol station. These hoses are equipped with specialised fittings and valves designed to securely attach to the inlet ports of the storage tanks. The driver must know which compartments in the tanker contain what types of fuel – accidentally pumping diesel into a petrol tank is an expensive and time-consuming mistake to fix.

The area is coned off, the hose is connected and fuel is being delivered

Initiating the unloading process

Once the hoses are securely connected, the driver initiates the unloading process by activating the pump system on the fuel tanker for each compartment. The pump begins to transfer fuel from the tanker’s storage compartments into the underground tanks at the petrol station.

Monitoring the unloading

Throughout the unloading process, the driver closely monitors the fuel flow using the sight glass and ensures it is being transferred safely and efficiently, without leaks. The driver may periodically check the pump system, monitor fuel levels in the storage tanks, and keep an eye on any gauges or indicators on the lorry’s control panel.

If there is not enough room to deliver all the fuel from the tanker, then the driver will deliver only as many full compartments as the tank will hold. If the driver is driving a truck and trailer combination, the trailer fuel is delivered first as this makes for safer driving.

When delivering with a truck and trailer, the trailer fuel is delivered first

Completion of unloading

Once the desired quantity of fuel has been transferred from the tanker to the petrol station’s storage tanks, the driver stops the pump system, drains the hoses into the customer’s tank and disconnects the hoses from the storage tank inlets. The hoses are carefully drained to ensure that no fuel is spilled during disconnection. If buckets are used to collect excess or drips, these are usually metal so that they are grounded.

The driver then dips the tanks again to verify the delivery is complete and then closes all the fill boxes. If the site is open (i.e. people are filling up with fuel), there may be a discrepancy in the readings.

Safety checks and departure

Before leaving the petrol station, the driver conducts final safety checks to ensure that all equipment is properly stowed and that no fuel spills or leaks have occurred. Spills can be cleaned up using a spill kit; drivers must have spill kit training. Once satisfied that everything is in order, the driver prepares to depart from the petrol station, fills out any documentation and continues with their scheduled route.

Overall, the process of unloading fuel from a tanker to a petrol station involves careful planning, attention to safety, and efficient operation to ensure that fuel is delivered securely and without incident.

Posted in Advice

What is a LOLER inspection for tail lifts?

LOLER stands for Lifting Operations and Lifting Equipment Regulations. A LOLER inspection on a tail lift refers to the examination and assessment of a tail lift to ensure it complies with LOLER regulations in terms of safety and functionality. In the case of a tail lift, it is also work equipment, so falls under the Provision and Use of Work Equipment Regulations (PUWER)

What is a LOLER Inspection on a Tail Lift?: A LOLER inspection on a tail lift involves a thorough examination of the lift to ensure it is safe to use. This inspection includes checking various components such as hydraulic systems, safety mechanisms, structural integrity, and any other parts crucial to the safe operation of the tail lift.

Inspections under the regulations start at pre-start checks conducted by the operator; the method for doing these is covered in tail lift training. These don’t usually require records to be kept for tail lifts. Weekly or monthly checks may be in more depth. However, it’s the scheduled inspection yearly which is much more detailed.

The frequency of LOLER inspections depends on various factors, including the type of tail lift, its usage, and the manufacturer’s recommendations. However, LOLER regulations require that lifting equipment undergo regular inspections to ensure safety. In general, tail lifts used in commercial settings are often subject to annual LOLER inspections. However, more frequent inspections may be necessary for tail lifts used intensively or in demanding environments.

Who Conducts a LOLER Inspection?: LOLER inspections are typically carried out by qualified inspectors or engineers who have the necessary knowledge and expertise to assess lifting equipment. These inspectors may work for specialised inspection companies or may be employed directly by the owner or operator of the tail lift.

It’s essential for businesses and operators to adhere to LOLER regulations and ensure that tail lifts undergo regular inspections to maintain safety standards and prevent accidents or malfunctions during operation.

Posted in Advice

Discovering New Zealand by car: plan your adventure today

Exploring New Zealand by car is a great choice, or at least it is until we are able to teleport around! With your own vehicle, you can visit places like the peaceful Bay of Islands or the awe-inspiring Milford Sound, which are less accessible if you don’t have your own set of wheels.

Of course, planning your route is a key part of the experience. But where should you begin? Is there anything you need to know before you arrive on the island? Let’s go through the important details that you need to keep in mind to make your trip unforgettable. Plan your dream trip and rent a campervan in NZ today.

Lake Pukaki

Choosing your vehicle

Picking the right vehicle for your trip across New Zealand is the first thing you should focus on. This will allow you to make sure you have the best experience while travelling through some of the most stunning scenery in the world.

In general, if you’re looking to save money and also need a place to stay, a campervan is a great option, as it will let you travel freely and offer you a comfy spot to sleep after a day full of activities.

However, if you’d rather stay in hotels or other accommodations, renting a car might be better for you; this decision should match how you like to travel. It’s all about ensuring your vehicle fits your plans for exploring New Zealand’s beautiful cities and natural sites.

Best travel seasons

Choosing the right time to explore New Zealand can make your trip even more memorable. In general, the best weather for road trips is during the summer months, which in the case of the Southern Hemisphere means from December to February.

During these months, you can expect plenty of sunshine, which enhances the beauty of New Zealand’s diverse landscapes, and you won’t have to worry about driving under poor weather conditions.

Beyond that, for those who prefer to travel when it’s less crowded and still enjoy pleasant weather, the months of November and March are ideal, and even April if you are staying in the north. These shoulder seasons offer the advantage of fewer tourists and the opportunity to see New Zealand’s scenery in full bloom or adorned with the colours of autumn; bear in mind, though, that deciduous trees give way to evergreen subtropical native trees the further north you go.

Before you pick up your campervan, remember to check the New Zealand road rules on our sister website.

What to visit in the North Island

New Zealand’s North Island is a place where you can see the earth’s natural power in action, enjoy beautiful beaches, and learn about Maori culture. Here’s what we recommend:

  • Start your trip in Rotorua to witness its incredible geothermal activity. Watch bubbling mud pools and enjoy the thermal springs’ bright colours, displaying the Earth’s inner heat.
  • Then, head to Matamata, home to the Hobbiton movie set, and feel as if you’ve stepped into the magical world of Middle-earth.
  • Explore the Bay of Islands, perfect for those looking for a bit of sun next to the water or if you want to try a new watersport.
  • Finish your visit in Auckland; a great city known for its lively markets, delicious food, black sand west coast beaches, and the Sky Tower, a landmark that offers amazing views of the city.

South Island adventures

Exploring the South Island, you can spend a lot of time finding hidden gems and some of the best places in the world. Here are just a few things you can see:

  • Let yourself be amazed by the Southern Alps, which are famous for their high glaciers and quiet fjords.
  • Make sure to include a visit to Milford Sound Lodge. It’s in a breathtaking place with calm waters and high peaks all around.
  • Then, there’s Franz Josef Glacier, where you can go on guided walks to see the incredible ice formations up close, showcasing the power of nature.
  • Don’t miss Lake Tekapo and Lake Pukaki. These lakes have bright blue waters and are surrounded by big mountains, making them perfect spots to relax and enjoy the view.

So, are you prepared to hit the road for a great trip across New Zealand? It doesn’t matter if you want to explore the sunny beaches of the North Island or discover the stunning waterfalls in the South: with your own vehicle, each day will be filled with something new to see.

Choose the right car, pack thoughtfully, and be open to the beauty and adventure that await you at every turn. We’re sure you’re going to love the Land of the Long White Cloud!

Posted in Advice

Cost of car shipping: Factors and how to save

Before you go and ship your vehicle, it’s important to understand how much it will cost, the factors involved in the price estimate, and how to save money in the long run.

We’ll also cover how to find a reputable car transportation company, what to look for, and what to avoid.

While shipping a vehicle can seem like a daunting task, a few tips can save you a lot of trouble down the road. Below we’ll get into everything you need to know about car shipping!

Factors that Go Into the Cost of Car Shipping

Distance

The average car shipping cost is around £900, or around £.90 per mile when using a typical shipping distance of around 1000 miles. Depending on the type of shipping you’re doing, international or domestic, the rate per mile can change drastically.

The more miles you cover, the less you will pay per mile. You can also work with a flat fee if you’d like, but you may want to keep it at a per-mile rate to keep everything as fair as possible. Every transport company works differently, so you’ll need to speak with them to know the rates you’re getting.

Rates can fluctuate from £.50 to £1.35 depending on the type of time of year, type of shipping, weight of the vehicle, and even delays due to weather. The best move when working with a car transport service is to get a flat quote before you sign any contracts, so there are no surprises.

If you’re unsure what costs you will incur, you can always try to get a free quote from a service like A1 Auto Transport Inc. This way, you get an idea of the estimated cost before you go ahead with any transports you have in mind.

Type of Shipping

The type of shipping that you decide to go with will also affect the cost of the car shipping. The most common type of car shipping is open trailer shipping on a car transporter. Domestic shipping is the most economical form of shipping as the trailers can fit up to 12 vehicles at once.

The downside of open trailers is that they are just that: open. If your vehicle is a luxury vehicle, then you may not want to go with an open trailer, even if it is cheaper. The more expensive option is enclosed trailers, which only hold up to 5 vehicles depending on the size. The vehicles are protected from the outside world (and any onlookers).

If you have more money to spend and want to protect your vehicle from any weather damage or potential accidents, then you’ll want to go with an enclosed trailer. The cost of shipping is going to be much more if you’re planning to ship your vehicle overseas using enclosed shipping.

Time of year

The time of year is also a factor when it comes to vehicle shipping. The best time to transport a vehicle is usually during September and October, as the weather is fairly mild and there are not a lot of shipments during this time of year. The reason is that many people move during spring and summer. Fewer people are travelling and are at home, so there are not too many people on the road which means transport happens faster domestically.

Winter is worse because of weather factors and delays around the holiday season, while summer sees more families on the road vacationing, as well as a lot more packages shipped on international routes. Cargo ships are also packed during the lead up to Christmas, making it more expensive to ship anything as well.

Vehicle Size

The size of your vehicle also comes into play, as the more the vehicle weighs, the more fuel is used, and that cost is passed onto the consumer. A typical sedan will cost around £450 to £1750 per 1000 miles. 

For a pickup truck or SUV, expect to pay around £850 to £1950 depending on the time of year. Remember the more miles being traveled, the less you’ll have to pay per mile, but the reduction in fees is not as much as you’d expect from longer travels.

What to look for in a transportation company?

You’ll always want to go with a well-reviewed transportation company. If they fail to have an online presence, this could be a red flag. It’s best to never work with a company that won’t agree to a flat rate, as they may try to raise the price at the last minute to your detriment.

You can always contact the Department of Transport to double-check if the company you’re inquiring about is licensed to run and operate in the UK region. Not all companies are created equally, and when dealing with your vehicle, it’s better to be safe than sorry. 

Posted in Advice

Tips for driving a large truck uphill and downhill

Uphill

Preparing for the incline early is important. The keys to successful uphill driving are gears, traction and momentum. If you drive an automatic truck, you don’t have to worry so much about the gears although, if possible, you may choose to change down earlier to keep the revs in the optimal torque band to avoid losing speed early in the incline.

It is wise to disable cruise control on steeper hills so that you have control over the speed without the truck desperately gunning for an unattainable speed.

If you are on a main road or motorway, you don’t have to worry about traction, simply use the appropriate gears. If your lorry won’t be able to maintain its speed, ensure you’re in the left lane on a multi-lane carriageway so that other road users can overtake you.

On long hills, don’t over-rev the engine or you risk overheating it. Let the torque pull you up the hill.

As the gradient levels out, reduce your accelerator input as required, especially if it’s about to turn into a downhill slope. You need to be thinking about your speed downhill.

Slippery surfaces uphill

Maintaining momentum, however slow, is the single most important driving task on slippery uphill surfaces. If you stop, you might not be able to get moving again, and if you wheelspin, you might lose all your momentum.

Use all the available drive wheels; this might mean you need to engage axle interlocks

Don’t tailgate otherwise you might find yourself braking too much and slowing yourself down. If you leave a good 6-10 seconds between you and the vehicle in front, you can smooth out any speed irregularities so that you maintain your speed.

In snowy weather, where it’s not very cold and the rutted snow is thawing slightly, follow the tyre tracks of other vehicles rather than trying to create your own path. However, in very cold temperatures, compacted snow is more slippery than fresh snow, so you may find more traction forging your own path slightly to the left or right of existing tyre tracks.

At some point, you may need snow chains, or to wait for a snow plough. When driving in snowy weather, you should be prepared to have to wait.

Using a Roadranger on a steep uphill

You’ll get to know the characteristics of your engine, and it will depend on the torque and horsepower, so these are rough guidelines that may or may not work for your specific vehicle.

If you’re starting on the hill, you should ideally be in a gear where you simply need to bring up the clutch slowly with no accelerator.

When changing gears you’ll need extra momentum so that you don’t lose all the speed when you dip the clutch. Add around 200-300rpm to your normal downshift. If you usually downshift at 1000rpm, then you’ll downshift at 1200-1300rpm instead because you’ll lose momentum quickly.

You might find that you start to lose speed at 1500rpm, in which case, changing down above there is best. Some trucks have their best performance between 1600-1900.

You might not need to double clutch when going uphill because the revs drop fairly quickly, but you do need to practice the timing. It’s always better on the gearbox to double clutch rather than single clutch or ‘floating’ the gears (no clutch).

If you need more help with a Roadranger, this Roadranger course will help.

Downhill

The keys to successful downhill driving in an HGV are low speed, correct gear and engaging engine brakes. You should hardly be using your service brakes. The engine brakes and gear selection are the best options to reign in all that kinetic energy. Don’t use cruise control.

As you approach the downhill section, you should be reducing your speed to the speed you want to go downhill. Braking on a downhill slope is much more difficult; braking hard on a downhill slope can easily result in a jackknife situation. It’s best to already be in the correct gear at the start of the slope and maintain a consistent speed all the way down.

On long downhill stretches, stopping in a rest area halfway down is a good way to let your brakes cool off.

Slippery surfaces downhill

10 seconds is a good-sized buffer to the vehicle in front. Keep your speed down. If you lose control it will be extremely difficult to regain control. Using the engine brakes reduces the risk of locking up the wheels.

Some roads have runoff areas to arrest the speed of runaway trucks. Look out for signage for these; hopefully you’ll never need to use one!

Posted in Advice
Recent Posts